
|
|
|
Bowl Gouge |

Edge angle
Guidelines shown below are for use with the Tormek gouge jigs (SVD-186 R, SVD-186, or SVD-185).
Guidelines below can be taken with two approaches :
| α |
Rake |
Relief |
Comments |
|---|---|---|---|
| 40° | 40°-50° | 10° | Primary bowl gouge - the 40°/40° is good. |
| 55° | 10° | 10° | Used for the inside bottom of the bowl. |
|
When a work lifts your spirits and inspires bold and noble thoughts in you, do not look for any other standard to judge by: the work is good, the product of a master craftsman. Jean de la Bruyere |

click on the gray block to see more
A relief ground into the bottom part of the gouge helps reduce bruising the wood as the turner comes around the inside curve of the bowl. The Tormek handbook, Water Cooled Sharpening of Edge Tools, refers to this as “Rounding Off the Heel”.
The heading rows were repeated with each grinding angle to make the table below more useful.
|
General Guidelines |
||||||
|---|---|---|---|---|---|---|
| α |
Rake |
Relief |
SVD-185/186 |
Comments |
||
|
JS |
P |
Hole |
||||
| 40° | 40° | 5° | 2 | 75mm | A |
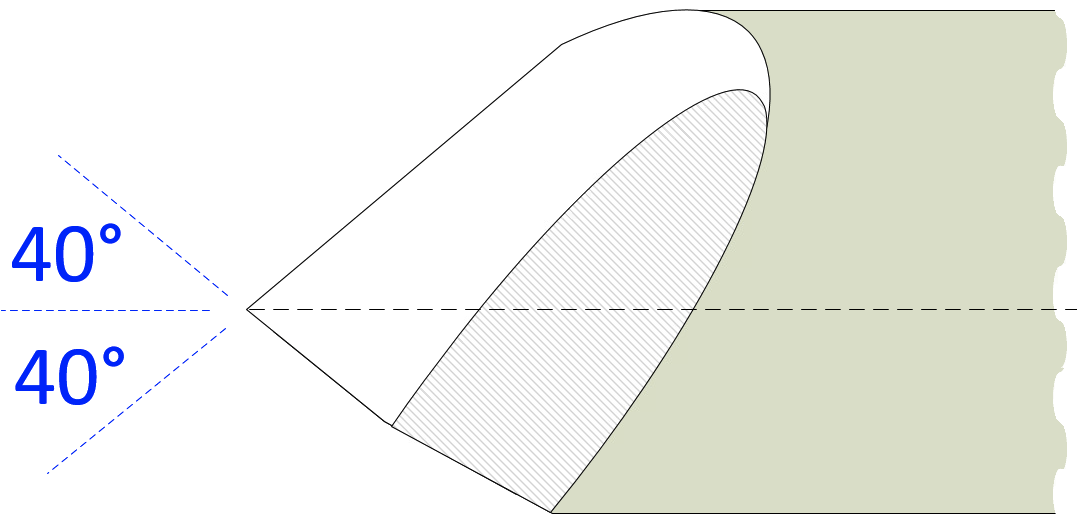
40/40 Grind The “40/40” grind is advocated by Stuart Batty (Allan's son), and is used by his protégé Ashley Harwood. They both advocate hand grinding on a platform set for 40° (a number of companies make such platforms). My experience is that this shape is very useful for the really hard woods used in ornamental turning. Examples include African Blackwood and Desert Ironwood (both with Janka hardness measures > 13,000 N). As shown in the diagram to the right, the wings are not swept back as far as the diagrams below, but the α remains the same. Also, the wings (on the rake) are recommended to be flat, not convex. This is because the wings are not a key element of the style Stuart uses for his work (unlike that advocated by David Ellsworth). I have found it difficult to produce truly flat wings; mine are more convex. This has not decreased the usage of the tool's grind shape for me. Stuart Batty has a number of great videos on Vimeo showing his SB Tools, including some on sharpening. Henrik Franck Stampe provided a set of instructions for adding a 40/40 grind using a Tormek grinder. Flute Note: The bowl gouge sold by Ashley Harwood has a parabolic flute. Feedback I've seen regarding this grind shape has noted that the parabolic flute seems to work best for this grind. Additional feedback I've read is that a U-shaped flute does not work well with this grind. |
| 40° |
60°
to 75° |
5° | 2 | 75mm | A |
The profile shown to the right with long swept back wings can be achieved by adding more side-to-side swing of the tool when sharpening it (i.e., grinding the wings further back for a higher rake angle -- more information about this is in the comments below). The Tormek handbook, Water Cooled Sharpening of Edge Tools, advises that this grind shape is not recommended for starter-level turners as it can be somewhat aggressive, but many others feel that 40° is the optimal grind angle (except for bowl bottom gouges, where 60° is recommended). Note: I do not see this grind discussed often in woodturning fora or at woodturning tool sharpening events. |
| α |
Rake |
Relief |
SVD-185/186 |
Comments |
||
|
JS |
P |
Hole |
||||
| 45° |
5°
to 15° |
5° | 2 | 65mm | A |
The Tormek handbook, Water Cooled Sharpening of Edge Tools, recommends that this grind shape is for turners of all skill levels. Others feel that 40° is a far better grind angle (except for bowl bottom gouges), especially if pursuing a multiple bowl gouge workflow. Note: I do not see this grind discussed often in woodturning fora or at woodturning tool sharpening events. |
| 45° |
45°
to 60° |
5° | 2 | 65mm | A |
The "Irish" profile with swept back wings was pioneered by Liam O’Neil, and can be achieved by adding more side-to-side swing of the tool when sharpening it (i.e., grinding the wings back further). Allan Batty recommended this angle, though Stuart Batty noted that his father's recommendation for this angle was based on his production work being made easier (vs. using a second bowl gouge for bowl bottom work). Stuart's stories of working for his father are worth the price of admission to his classes (oh, and the instruction is good too). |
| α |
Rake |
Relief |
SVD-185/186 |
Comments |
||
|
JS |
P |
Hole |
||||
| 50° |
5°
to 15° |
5° | n/a | n/a | n/a |
This is a good grind for bottoms of shallow bowls. The wings do not need to be swept back, and indeed the rake angle may tend towards 80°. |
| α |
Rake |
Relief |
SVD-185/186 |
Comments |
||
|
JS |
P |
Hole |
||||
| 55° |
5°
to 15° |
5° | 4 | 65mm | A |
The larger edge angle is beneficial when turning deeper within bowls. Tom Wirsig noted that this angle, coupled with a U-shaped flute, is best for figured woods, also noting that it must be very sharp (see also, "Tips for Turning Figured Woods", in the October 2022 edition of "American Woodturner"). Tom also recommends a shape where the wings are not swept back, with the rake angle tending towards 80°. |
| α |
Rake |
Relief |
SVD-185/186 |
Comments |
||
|
JS |
P |
Hole |
||||
| 60° |
5°
to 15° |
5° | 6 | 75mm | A |
This is a good cutting angle for bottoms of the bowl, especially a deep bowl. The rake angle (wing sweep) will look like the one shown above for 55°. |
| 60° |
60°
to 75° |
5° | 6 | 75mm | A |
The “Ellsworth” shape, made famous by David Ellsworth (one of the founders of the American Association of Woodturners - Member #1) has wings which have a very pronounced convex shape. David turns a lot of wet wood for the objects he makes, and I have found that this shape works well for such turning. I have also found that this shape is not as usable for really hard woods (i.e., Desert Ironwood or African Blackwood). These wings are a key element of the style David uses for his work (unlike that advocated by Stuart Batty). Flute Note: The bowl gouge developed by David Ellsworth has a parabolic flute. Feedback I've seen regarding this grind shape has noted that the parabolic flute seems to work best. Other feedback notes that a U-shaped flute works well for this, especially for the bottom of a bowl. That same feedback also noted that the α could be as high as 75° - 80°. Also, the wings would not be swept back for this use. |
The best shape for the edge is slightly convex or flat.
| Good |

Slightly Convex - best shape |

Flat - acceptable shape |
| Bad |
Overly Convex Cause: excessive grinding on the front edge. |
Concave Cause: excessive grinding on the wings/sides. |


Grinding the Top of the Cutting Edge
Henrik Franck Stampe provided this set of instructions for making a 40/40 grind using a Tormek grinder. He noted that this helps get a flat edge on the wings as shown in the picture to the left. As he also noted: trying to control the wing shape using precise side-to-side movements is difficult, oftentimes leaving the wing edges a mess.
Step 1: Grind the top of the cutting edge flat
Settings: Hole A | JS 4 | P ~45
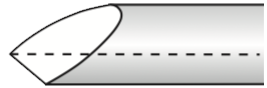
Place the bowl gouge “upside down” in the SVD-186 (bowl gouge's flute opposite the screw knob, as shown in the picture to the right). This is a bitt fiddly, but it is quite possible. Set the tool's projection in the SVD-186 to around 45mm.
Using the side of the grinding wheel, grind the top edge flat, very carefully and very little at a time. This is shown in the picture to the right (click on the picture to see a bigger version).
Step 2: Grind the cutting edge
Settings: Hole A | JS 2 | P 75
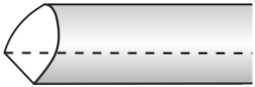
Place the bowl gouge in the SVD-186 in the more typical fashion (bowl gouge's flute towards the screw knob). Set the tool's projection in the SVD-186 to 75mm.
Grind the cutting edge using the face of the grinding wheel.

Image courtesy Tormek
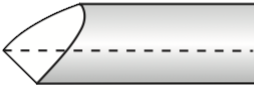
The wings can be extended for a greater rake angle by the way you grind. The rake angle is increased when you spend more time grinding on the wings, and when you increase the amount of swing you use when grinding.
The diagram to the right shows this movement.
Glenn Lucas' video, Avoiding common problems when sharpening woodturning tools, is a good one to review before proceeding down this path. A link to that video is below.

Comparison of two bowl gouges; one old, one new
When the tool gets too short to be held by the jig, you can grind off the top as shown in the upper tool in the picture to the left. This flat area allows for the jig to hold the tool without the tool slipping or rotating.
And when it gets even too short for that, consider making it into a round negative rake scraper (great for bottom corners of boxes), a beading tool, or a point tool.
|
|
